Introduction: More Than Just a Facelift
When you decide to undertake a bathroom remodel, you are doing more than just picking out new colors; you are re-engineering the most technically demanding room in your house. A bathroom is a unique environment where pressurized water, high-voltage electricity, and complex drainage must coexist within a small, moisture-rich footprint. While many homeowners are drawn to the aesthetic “after” photos, the real success of a project lies in the “bones” of the renovation, structural integrity, the plumbing upgrades, and the waterproofing systems that remain invisible once the tile is laid.
At Southern Home Remodeling, we believe that a professional-grade remodel should be approached with a “systems-first” mindset. This means treating every component from the subfloor to the ventilation fan as part of an integrated shield against moisture and wear. This guide is designed to strip away the confusion and provide you with an authoritative, step-by-step roadmap to navigate your renovation with the confidence of a seasoned pro.

Phase 1: Strategic Planning and Realistic Budgeting
Every great project starts on paper. Before you pick up a sledgehammer, you need a strategy that balances your “dream list” with the physical and financial realities of your home. Planning is the phase where you identify the scope: are you doing a “pull and replace” (keeping fixtures in the exact location) or a “custom footprint change”?
Mastering the Budget and Contingency
Budgeting for a bathroom remodel in Arlington requires a technical eye. At Southern Home Remodeling, we suggest the “Infrastructure First” rule. Allocate roughly 70% of your budget to items you cannot control, such as plumbing, electrical work, and waterproofing. The remaining 30% can be allocated to high-impact visual elements, such as vanities and fixtures. Why? Because a $2,000 faucet won’t matter if there is a leak in the wall behind it. Always include a 15% contingency fund. In older homes, “surprises” like rotted joists or outdated galvanized pipes are almost a guarantee once the walls are opened.
Phase 2: Designing for Flow, Function, and Future-Proofing
Design is where ergonomics meets art. In a bathroom, every inch counts. If you’ve ever had a bathroom where the door hits the toilet, you know exactly what we mean. Professional design focuses on “clearances” and ease of movement.
Spatial Ergonomics and Universal Design
Standard building codes usually require 21 inches of clear space in front of a toilet, but for a luxury feel, we recommend 30 inches. Future-proofing is another critical design element. Are you planning on staying in this home for the next twenty years? If so, consider “universal design” features like a curbless walk-in shower or reinforced blocking behind the walls for future grab bars. These aren’t just for accessibility; they are modern luxury features that add significant resale value. At Southern Home Remodeling, we often suggest “comfort height” vanities (36 inches) over the traditional 32-inch height to make the space more ergonomic for adults.
Phase 3: The Surgical Precision of Demolition
Demolition is the most volatile part of the process. It isn’t just about smashing things; it’s about controlled deconstruction. A “surgical demo” ensures you don’t damage the structural integrity of your home or the plumbing lines you intend to keep.
Structural Audits and Dust Mitigation
During this phase, dust mitigation is your best friend. Use heavy-duty plastic barriers with zippers and negative air machines to prevent drywall and mortar dust from traveling into your bedrooms. Once the room is stripped to the studs, it’s time for a structural audit. Check the floor joists for any signs of water damage or “deflection” (bounce). If the floor isn’t perfectly rigid, your new tile will eventually crack. This is the window of opportunity to sister those joists or install a thicker, more robust subfloor.
Phase 4: Mastering the Technical Rough-In (Plumbing and Electrical)
With the walls open, you can now see the “circulatory system” of your bathroom. This is when the heavy lifting happens. If your home has old copper or galvanized steel pipes, this is the time to upgrade to PEX (cross-linked polyethylene). PEX is flexible, resistant to scale buildup, and less likely to burst in freezing temperatures.
Modern Electrical Demands
From an electrical standpoint, modern bathrooms are power-hungry. Between powerful hair dryers and heated towel racks, you need a dedicated 20-amp GFCI-protected circuit to ensure safety and prevent breakers from tripping. Think about your “tech” needs now: do you want a bidet seat? A smart mirror with an integrated clock and Bluetooth? These require specific rough-in wiring that must be done before the walls are closed back up.
Phase 5: Building the Invisible Shield – Professional Waterproofing
This is the most critical step of any bathroom remodel. If you fail here, the rest of the project is on a timer until it leaks. Traditionally, bathrooms were built with “water-resistant” materials such as greenboard drywall. Today, we know that isn’t enough.
The Sealed System Approach
At Southern Home Remodeling, we advocate for a “Sealed System.” This involves using waterproof backer boards or membranes (like those from Schluter or Wedi) that create a continuous, airtight envelope. Instead of moisture just sitting on a liner, it is blocked at the wall surface. Before a single tile is installed, perform a “flood test.” Plug the shower drain and fill the base with water for 24 hours. If the water level doesn’t move, you have a solid, professional-grade seal.
Phase 6: The Art of Tile Selection and Installation
Tile is the “skin” of your bathroom. It defines the aesthetic and provides the ultimate defense against water. Porcelain is the industry standard for a reason; it is denser and less porous than ceramic, making it nearly impervious to water. If you choose natural stone like marble, be prepared for maintenance. Stone is porous and must be sealed regularly to prevent staining from soap and oils.
Precision Layout and Epoxy Grout
Installation is where geometry becomes art. A professional installer spends hours on the layout before mixing any mortar, ensuring that you don’t end up with tiny slivers of tile in the corners. For the most durable result, use epoxy-based grout. Unlike traditional cement grout, epoxy doesn’t need to be sealed and is virtually stain-proof. It keeps your shower looking brand new without the need for aggressive scrubbing.
Phase 7: Cabinetry, Vanities, and Smart Storage Solutions
Storage is the engine that keeps a bathroom organized. When selecting a vanity, look for all-wood construction. Particle board vanities tend to swell and peel in high-humidity environments. A custom vanity allows you to maximize every square inch, perhaps adding a pull-out for hair tools with an integrated power outlet.
Visual Expansion and Countertop Choice
If you have a small space, consider a “floating” vanity. By exposing more of the floor, you create an optical illusion that makes the room feel larger. Pair this with a quartz or granite countertop. These stones are nearly indestructible and won’t be damaged by heat or the various chemicals found in perfumes and cleaners.
Phase 8: Layered Lighting and High-Performance Ventilation
The best bathroom design in the world can be ruined by poor lighting or a weak fan. Lighting and air quality are the final layers of a high-end transformation.
Lighting Layers and Moisture Control
Lighting should be layered. You need task lighting (sconces at eye level) to eliminate shadows while you’re shaving or applying makeup, and ambient lighting (recessed ceiling cans) for general brightness. Ventilation is the unsung hero of bathroom longevity. Your exhaust fan needs to be powerful enough to move the entire volume of air in the room several times per hour. Look for a high-CFM (Cubic Feet per Minute) fan with a low “sone” rating, meaning it’s quiet enough that you’ll actually want to use it. Proper venting directly to the outside of the house, never the attic, is non-negotiable for preventing mold.
Conclusion: Your Sanctuary, Perfected
A bathroom remodel is a significant investment, but when done with a focus on technical excellence and thoughtful design, it is one of the most rewarding changes you can make to your home. By prioritizing high-quality infrastructure, professional waterproofing, and ergonomic layout, you transform a utilitarian room into a high-performance sanctuary.
At Southern Home Remodeling, we believe that quality is in the details you can’t see. Whether you’re tackling a small guest bath or a grand main suite, the goal remains the same: a space that is beautiful, durable, and a true reflection of your home’s potential. We hope this guide has given you the technical clarity you need to start your journey.
How to Remodel a Bathroom: A Step-by-Step Guide for Homeowners
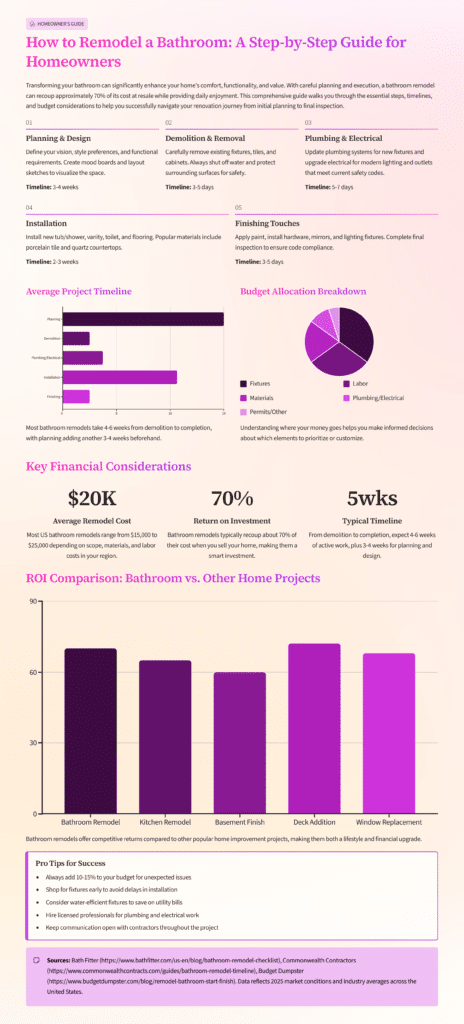
- Step 1: Planning & Design
- Define your goals: style, functionality, storage
- Average planning time: 3-4 weeks
- Visual: Mood board examples & layout sketches
- Step 2: Demolition & Removal
- Remove fixtures, tiles, and cabinets carefully
- Safety first: shut off water, protect surfaces
- Visual: Before/after demo photos
- Step 3: Plumbing & Electrical Updates
- Rework plumbing for new tubs/showers
- Upgrade lighting and outlets for safety & style
- Visual: Diagram of plumbing/electrical zones
- Step 4: Installation of New Fixtures & Flooring
- Install tub/shower, vanity, toilet, and flooring
- Popular materials: porcelain tile, quartz countertops
- Visual: Chart of material cost ranges
- Step 5: Finishing Touches & Inspection
- Paint, hardware, mirrors, lighting fixtures
- Final inspection ensures code compliance
- Visual: Checklist iconography
- Key Statistics:
- Average bathroom remodel cost in the US: $15,000 – $25,000 (2025 data)
- Typical remodel timeline: 4-6 weeks
- ROI on bathroom remodel: recoups ~70% of cost on home resale value
- Source: Commonwealth Contractors (2025), Bath Fitter (2021), Budget Dumpster (2025)
- Visual Data Elements:
- Timeline bar showing 5 main steps with weeks allocated
- Pie chart of average budget allocation (fixtures, labor, materials)
- ROI bar graph comparing bathroom remodel vs other home projects
Sources:
- Bath Fitter: https://www.bathfitter.com/us-en/blog/bathroom-remodel-checklist
- Commonwealth Contractors: https://www.commonwealthcontracts.com/guides/bathroom-remodel-timeline
- Budget Dumpster: https://www.budgetdumpster.com/blog/remodel-bathroom-start-finish
Southern Home Remodeling Serving the Bedford Community and Beyond in Bedford, TX
Southern Home Remodeling is dedicated to serving the diverse needs of the local Bedford community, including residents of neighborhoods like Meadow Park. With its convenient location near landmarks such as the Meadow Park Athletic Complex and major intersections like Park Pl Ave and Airport Fwy (coordinates: 32.82995, -97.130544), we offer expert bathroom remodel services.
Whether you are looking to update a mid-century home near the park or are planning a modern master suite overhaul in the heart of the city, our technical expertise ensures that your renovation meets the highest standards of safety, durability, and style. We understand the specific building codes and architectural nuances of the Bedford and Tarrant County area, making us a trusted partner for your home’s transformation.
Get Bathroom Remodel Services at Meadow Park Now
If you are a homeowner in the Bedford area looking for a team that prioritizes structural integrity and professional-grade waterproofing, Southern Home Remodeling is ready to help you navigate the process. Transforming your bathroom is a significant investment, and having a local expert who understands the local environment is key to a long-lasting result.
Call or contact us today to discuss your technical requirements or schedule an initial consultation for your bathroom remodel. Reach out to the Southern Home Remodeling team.
Navigate from Meadow Park to Southern Home Remodeling Now
Frequently Asked Questions (FAQs)
1. How long does a typical bathroom remodel take? A full-scale, professional remodel usually takes between 4 and 6 weeks. This timeline accounts for the necessary structural work, drying times for waterproofing, and the precision required for finish tiling and cabinetry.
2. What is the most expensive part of the project? Labor and plumbing are typically the most significant expenses. Relocating fixtures like a toilet or shower requires moving heavy drainage stacks, which can significantly increase the technical labor involved.
3. Should I choose a tub or a walk-in shower? For a main suite, a large luxury walk-in shower is currently the most popular choice for comfort and resale value. However, it is generally recommended to keep at least one bathtub in the house for families with children.
4. Can I save money by painting over my old tile? While tile refinishing exists, it is a temporary cosmetic fix. In a wet environment, the paint will eventually peel or chip. For a long-term bathroom remodel, replacement is always the better investment.
5. How do I prevent my new grout from getting moldy? The best way is to use epoxy grout, which is non-porous and naturally mold-resistant. Additionally, ensure your exhaust fan is powerful enough to clear the steam from the room within 15 minutes of finishing your shower.
Would you like me to develop a detailed material selection guide to help you choose among different tile and countertop options for your project?